This is the detailed article for guiding horizontal flow wrapper operation and troubleshooting tips by video and text, total 16 applicable steps enable you become a master in a short time. estimated reading time: 35 minutes
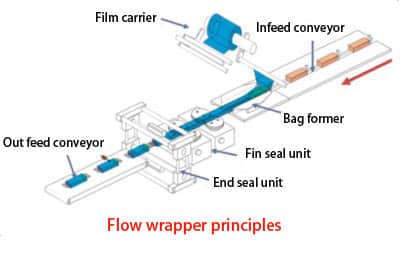
Flow Wrapper Principles.
Before give instructions, let’s take a look at flow wrapper principles. All type flow wrappers have a film carrier (at least one film carrier, some wrappers have double film carriers for quick changing function), an infeed conveyor, a bag former, a fin seal unit (bottom seal), an end seal unit (end sealing system), an out feed conveyor. Products were carried by infeed conveyor into film tube which is formed by bag former, then fin seal unit make bottom sealing, end seal unit cut for individual bags. Refer drawing below. The whole process is continuous type, fast speed. It is widely used for food packing and other solid shape products packing in bags.
Operation video
Operation Steps.
Let's take a sample packaging machine SP100 for reference.
Step 1: Load correct size film roll and fasten it on carrier tightly.
- Select suitable width film according to product size. Don’t know how to get film width from product size? check this article for help "how to calculate bag size and film width"


- Load the film, fasten the hold wheel by rotating clockwised.
Technical Tips:
- The wheel should be fasten closely, the cone shape part of inside and out side hold wheels should carry film inner roller totally.
- Film’s center point should be at the same place as film carrier's center point.
By this, film roll will be holded closely by carrier, can not run to inside or outside direction during operation, so machine’s eyemark sensor can keep registering film marks successfully.
Step 2: Pass film through rollers correctly, refer drawing below.
Wrong film threading way could cause film wrinkle problem when running.

Step 3: Adjust bag former width, height and angle position.
Bag former adjustment is very import to make film tube and let film run smoothly.
- Bag former width should be adjusted according to product width, with a little gap to let product go through.
- Bag former height normally no need to adjust, only if you find bags’ fin seal area is too big or film burst out during operation.
- Bag former is not installed in horizontal way, but with an angle, we suggest 15-20° angle to left-up position, So film can be fed smoothly from film roller to bag former, also help to form L shape feeding result. Refer Step 4.


Step 4: Adjust film rolling bars’ position.
Film rolling bars can be wagged for different positions, the purpose is to let film has tensions between film roller and bag former, to make L shape result (film tight tension result).
- For small width film, around 150mm, the rolling bars' position is showed by picture below.


- For big width film, around 300mm, the rolling bars’ position is showed by picture below.

 However, these positions are not standard, the only purpose is to make strong tension between film roller and bag former.
Step 5: Move forward product guiding plates.
Product guiding plates should be moved to film pulling wheel place as much as possible, so that products can be fed into film tube with side protection.
Step 6: Use different size bag former plates.
As bag former is adjustable for wrapping difference size products, so the relevant bag former plates need to change accordingly. Why? The reason is showed by step 4, the purpose is to let film has tension during feeding.
For wrapping small width product, around 20-50mm, the bag former plate should use a short one.
For wrapping big width product, above 50mm, the bag former plate should use a long one, to move bag former plates to infeed conveyor side with long length, which can make bag forming process more smoothly. (Bag former has more transition area to form film in tube shape)

Step 7: Pass film through fin seal unit and end seal unit, run machine.
Pass film through fin seal unit and end seal unit, run machine to check film running status, if not running smoothly, please check which place has the wrinkle or block problem, find the solutions according to relevant operation steps.
Only if machine can make empty bag smoothly, then to put product on packaging machine’s conveyor for test packing.
Step 8: Set sealing temperatures
Set request temperatures, it can be difference according to film materials, thickness and packing speed. Normally, PP film or OPP/CPP film, thickness 50 micro meters, speed 60 bags/min, Fin seal temperature set 140℃, End seal temperature set 140℃, are enough. With high packing speed, request for setting high temperature.
Step 9: Set machine Track on and Track off function.
Track on means machine will cut bags according to film marks, (mark is normally printed with black color).
Track off means machine will cut bags according to set length.
Track on function setting ways:
- Set machine screen display Track on, instead Track off.
- Measure film’s mark distance, input this distance into machine’s screen Bag length menu.
- Move eyemark registration sensor to film mark’s place, when one film mark go through, sensor’s light should be flashed one time, if not, adjust sensor’s sensibility.
- As soon as the tracking is performed, the bag will be cut in same the place always. (Error +/- 2mm)
- Stop machine, click screen by right side button or left side button to move film place, click track button to confirm the position, so machine will make bags according to new position.
Step 10: Adjust film pulling wheel position if necessary.
Film pulling wheel position is adjustable by wagging left side and right side. The standard position is not horizontal but a little left-down side, about 10 degree. So film can be pulled down and not burst out during running, however the left-down angle should not set big, in case of film burst out.
If film pulling wheel position is horizontal, it will cause fin seal eat too much film.
Notice: Normally Film pulling wheel position doesn’t need to adjust.
Step 11: Adjust iron plates closing gap.
With different film kind of film, the thickness is different, need to adjust iron plates closing gap, so film can go through smoothly and heated well, however this gap should not be adjusted too big for film must has temperature for sealing.
If you find film is blocked before iron plates, means the plate closing gap is too narrow, need to make wide adjustment 
Step 12: Adjust film sealing wheel speed.
The speed between film pulling wheel and film sealing wheel is adjustable, there is a synchro belt to connect two cone shape parts which drive sealing wheel.
Technical tips for film sealing wheel speed adjustment.
- For dot seal wheel, the speed should be adjusted slow, in the mean while to insure there is no film blocked.
- For ring seal wheel, the speed should be adjusted fast, so the seal line can be more straightly.
Step 13: End seal speed adjustment.
End seal speed adjustment, also called cutter speed adjustment, is referred to film feeding speed, not packing speed, there is a speed adjustment hand wheel to set. If cutter speed is too slowly, the film will be blocked before sealing jaw, if cutter speed is too faster, the film will be pulled out by cutters, which cause not enough sealing pressure and the bags may be broken by pulling effects.
Technical tips: when bag length changed, the end seal speed should be adjusted according. For some servo type machine, this step is done automatically by machine.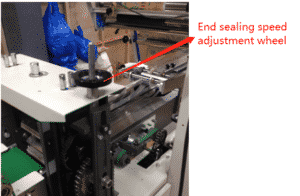
Step 14: Take products, make a test packing.
After machine can make empty bag smoothly, is the time to have a test packing with actual products. We know film size is made according to products. Don’t know how to calculate film size from product size? you may check this article"how to calculate bag size and film width"
- Input bag length. (Bag length is calculated by product length and width, refer article with aboved link.)
- Put a product on infeed conveyor, run machine to check product position inside of film tube.
- Change pusher’s position by hand wheel, lock the wheel after setting.
- Run machine with product sample, check product position inside of film tube again, Keep adjusting pusher’s position, until product can be fed to correct position.
Technical tips: After adjusting pusher’s position hand wheel, remember to lock it. Otherwise the position will be keep changed during operation.
Step 15: Adjust end seal system height.
To ensure the good sealing result, the sealing jaws closing line (upper jaw and lower jaw closed line) should be at the middle place of product height.
End seal system height adjustment way:
Loose the 4 screws around sealing jaw’s side panel, use spanner to adjust end sealing system height totally.
Step 16: Trouble shooting for end seal abnormal speed.
After cutting the hard products, the gear wheel position for upper jaw and lower jaw may changed, which lead abnormal speed for end sealing system.
For flow wrappers with rotatory end seal system, we know that the slowest point is the position of up jaw and lower jaw closing, so to enable enough sealing pressure for bags. If jaws gear wheels’ position changed, the slowest point is not the jaws closing position, which could lead bags broken by jaws pulling. Even though you have adjusted sealing jaws speed at slowest position by hand wheel, refer step 13.
To write in the final part: with above steps, if you still have troubles for flow wrapper’s operation, can contact us by email: [email protected] or Leave Message,we are glad for help.